
We are unable to reply to comments, so please message us directly if you have a specific question regarding products, shipping costs, etc. Our office number is (480) 207-1511. Our email is hello@spencertified.com. You can also message us on Facebook. Commonly asked questions and answers can be found on our FAQs page here.
How to Transfer Cassette Tapes to PC or CD
At SpenCertified, one thing we specialize in is helping you convert your old audio video formats to digital. Today, we are going to teach you how to convert your cassette tapes to a digital format. There are a few different ways to do this. You can record them to a CD using a cassette player and CD recorder, you can record them to a PC with an adapter and a cassette player or, the easiest way, you can purchase a cassette to PC device. A cassette to PC device will have everything you need except the cassette and computer.
Option 1 (easiest)- Use a Cassette to PC Capture device
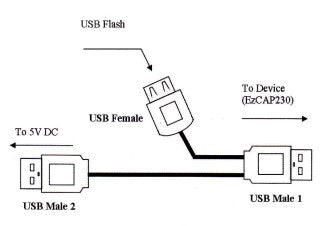
1. Get power- There are two ways to get power supplied to the device: Use 2 AA batteries or a USB port power supply (5V DC adapter, USB from computer, etc), by the supplied USB cable (comes with device in package) as below.
2. Put a cassette tape in device- Open the tape lid from the top of device and put a tape in, then close the lid.
3. PIug in a USB flash- Use an USB flash which has enough storage space
(about 1MB for 1 minute music recording). Plug into the device. Plug directly to the USB port of the device if use AA batteries. Plug to the female port of USB
cable if power is supplied by DC adapter.
4. Operate the cassette- You can use earphones or a speaker if plugged into the "AUX" to listen music when playing or recording music. There are 4 buttons on the top of device:

Once you press the play button, the cassette player start to work, you can see the wheel running through the small window, you can set the volume to a level you like by using the rotary switch. You will hear the playing music now if connected to an audio device, then let's start next step -- recording (converting).
5. Recording- When the cassette is playing, a USB flash is connected, and the device is under standby mode (indicator keep on), just simply press the recording button. Then the device will start to record (convert) the playing music to MP3 format, the indicator will be quick flashing (if not, this means it is not recording, re-plug your USB flash and try again). Press the recording button again to stop recording and save the MP3 file in the USB flash. During recording mode, press the next button and the device will stop recording after 3 seconds and save an MP3 file for that recording and then start recording again in a new MP3 file. The device will create a new folder called "EZCAP" in your USB flash and save the MP3 file in the folder. You will see each recorded MP3 file. lf you want to edit your recorded MP3 files, you can use a free software --- Audacity, download from: http://audacity.sourceforge.net
6. Playback- The device offers playback of the saved files so you can easily check the recorded file. At standby mode, press the playback button, the device will start to play the recorded music. The indicator will be slow flashing. Press the playback button again and it will stop playback and go back to standby mode. During playback, use the up/down button to choose to play previous or next file. Use the +/- button to set volume up and down.
Option 2- Record from a cassette player to a PC
1. Hardware Installation- The EzCAP Audio Capture device doesn't need any driver installation, as the Windows Operating System will install the driver automatically. Just connect audio capture USB connector into your computer's free USB 2.0 port. Check the drivers window on your computer to confirm proper connection.
2. Hardware Connection- Connect your Audio Capture device to your record player, CD player or cassette deck. You will need to also use a male-to-male RCA lead which is usually supplied with your audio equipment. Refer to the diagram below for a better understanding.

3. Software Installation- Insert the software CD in your CD drive, and double click “My Computer” and “EzCAP Audio Capture” CD icon. Double click “audio editing.exe” to install software, and select “Next”, “I accept the agreement” and/or “finish” to finish the software installation.
4, Operation- You may need to unplug the audio capture device and plug it into your computer again. Open the newly installed software from the homepage of your desktop.
5. Setup- Click the “Edit” dropdown on the software panel, and select “Preferences”. Then select the recording device to be “USB PnP Device”, and channels to be “2(Stereo)”. And select “Software Play through (Play new track while recording it)”, then click “OK”.
6. Recording- Begin playback of your vinyl, CD or cassette and click red record key to start recording audio. When you finish recording what you wanted, click yellow stop key.
7. Saving- Now you will look for "Export As MP3" in the "File" dropdown. You will have to name it and decide where you want to save it.
8. Playback- Now you can listen to the recording on your computer or move it to another device like a phone or USB.
Option 3- Cassette player and CD recorder
1. Connection- Connect any standard cassette player with an RCA output to the CD recorder.
2. Media- Insert the cassette you wish to record and a blank recordable audio CD. Make sure "NO TOC" and "CD-R (or CD-RW)" indicator lights on the display.
3. Setup- Select the correct recording source which would be analog.
4. Setup- Select whether to automatically or manually add seperate tracks. When the AUTO/MANUAL button is operated it will cycle through different options like so.

If automatically is chosen, a track will be created if silence is detected for more than 3 seconds. It determines silence based on the decibels detected. You can choose between -60, -50, -40 and -30 dB. If manual is chosen, you will need to push the record button while recording to add a new track.
5. Recording- Press play on the cassette player and adjust the recording level if necessary. Then press the record button on the CD player. Once you reach the end of what you wanted to record, press the stop button.
6. Finalization- Perhaps the most important step, finalize the CD. If you do not finalize, the recording will not be saved for playback on other players.
If you need a cassette player, we have many different options in our store as well HERE
Conclusion-
Transferring cassettes to digital is easier than ever when you utilize any of these options. To top it off, we have all the tools you need.
456 E Juanita Ave Suite 8
Mesa, AZ 85204
(480) 207-1511
Comments
Leave a comment