We are unable to reply to comments, so please message us directly if you have a specific question regarding products, shipping costs, etc. Our office number is (480) 207-1511. Our email is hello@spencertified.com. You can also message us on Facebook. Commonly asked questions and answers can be found on our FAQs page here.

HOW TO SAFELY CLEAN YOUR HOME STEREO SPEAKERS
THIS GUIDE WILL WALK YOU THROUGH HOW TO CLEAN ALL THE PARTS OF YOUR SPEAKERS LIKE A PRO
Take a look at your speakers: are they as clean as they were out of the box? If they’re not at a polished shine, you’re not alone! Speakers don’t require as much upkeep as other audio components and are typically only given a cursory wipe down every few months by most people.
However, speakers are an important investment. Dust, dirt, spills, and pet hair can potentially lead to damage. Regular maintenance is the key to keeping your speakers looking and sounding their best. Cleaning them thoroughly will help ensure you’ll have your speakers playing like new for years to come.
So without further ado, let’s walk through the basics of how to clean stereo speakers like a pro.
BEFORE GETTING STARTED

Before you start, you’ll want to gather some supplies. But don’t fret! The materials you’ll need are simple - nothing high-tech. You probably already have most, if not all, of the required materials in your home already.
Supplies to gather:
- Clean, lint-free, soft cloths
- A microfiber cloth or an old cotton t-shirt works well
- A feather duster or soft-bristled brush
- Ones with long, soft bristles like makeup brushes and paint brushes are recommended
- A vacuum cleaner with a dust brush attachment
- Cleaning solution
- A mild soap or detergent is best
- Clean water
- Compressed air
- Q-Tip (optional)
- Isopropyl alcohol (99%) or electrical contact cleaner (optional)
- Wood polish (optional)
Pro Tip: The key to cleaning speakers is to be gentle and patient. It’s easy to cause harm if you're not careful. So never use harsh chemicals, a rough cloth, or too much liquid.
HOW TO CLEAN THE SPEAKER CABINET

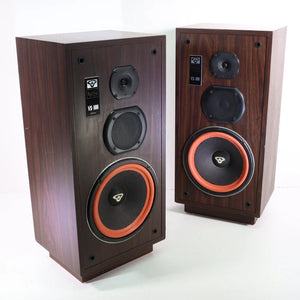
Before you begin wiping anything down, check what material the cabinet is made of. A variety of woods and veneer are used for the outside of the cabinets; they can also be coated with varnish, lacquer, or wax. These materials react differently to chemicals and water (for example, MDF is more absorbent than real wood), so it’s best to know if there’s anything you need to avoid using. Check the speaker’s manual if you’re unsure.
When you’re ready, start by dusting the cabinet with a feather duster, dust cloth, or soft-bristled brush. Once you’ve removed the worst of the dust, we recommend using two lint-free cloths (one wet, one dry). Moisten the cloth so it’s damp, but not soaking. If the cabinet is really dirty, add a bit of gentle soap or detergent. Add any liquid to the cloth itself, not the speaker, as this will help control the amount of water and soap used. Then proceed to clean one of the surfaces with the damp cloth. Be sure to wipe with the direction of the grain to preserve its appearance over time.
Once you’ve finished with one surface, wipe off any residue using clean water. Then dry it completely using the dry cloth. Keep going until the entire cabinet exterior is done. Once finished, you can add a coating of wood polish or varnish. If you do, use a separate cloth for this.
Pro Tip: Avoid the use of paper towels. It’s easy for them to get too wet, potentially damaging the cabinet. They can also leave small fibers or pieces behind.
HOW TO CLEAN THE SPEAKER GRILL

The speaker grill covers the driver and is responsible for protecting the speaker cones from dust and debris, so they get dusty pretty quickly. Grills are typically made of either fabric or metal. Sometimes they're not removable. If yours doesn't come off, you can use a lint roller or vacuum hose with a brush attachment to clean it; if it’s plastic or metal, you can wipe it down with a damp cloth.
If the speaker grill is removable, remove it gently, taking extra care not to tear fabric or break any gaskets that connect the grill to the cabinet. Once removed, if it’s a plastic or metal grill, clean it using a soapy cloth or a sponge, then rinse it off with clean water and dry it. If it’s a fabric grill, use the vacuum with a dust brush attachment to remove any dust or dirt from the surface. You can also slightly dampen your cloth and gently wipe it down. Then carefully dry it with compressed air or a dry lint-free cloth. Once it’s dry and you’ve finished with the rest of the speaker, carefully reattach it to the cabinet.
Pro Tip: Place the grill on a flat surface when you’re using the vacuum and dust brush. This will help ensure that the vacuum doesn’t stretch or warp the fabric.
HOW TO CLEAN THE SPEAKER CONES

Speaker cones are very delicate and easy to break. The tweeters especially are easy to damage, so be extra careful during this step. We recommend using a soft, long-bristled brush (like a makeup brush or paintbrush) to dislodge the worst of the dust and debris. You can also use a feather duster or dusting wand. If needed, you can also very, very gently use a microfiber cloth on the cones of the midrange and bass drivers.
You can also use a can of compressed air to blow the cone clean and free of dust. Hold the can several inches away and always blow the dust away from the cone, not into it. Particularly when it comes to the tweeters, using a can of air instead of a brush is the safest way to go.
Pro Tips: Use the least amount of pressure possible when touching the cones. Never use cleaning solutions that could potentially damage them or the surrounds.
HOW TO CLEAN THE SPEAKER TERMINALS

The speaker terminals are an easy place for grime to accumulate. First unplug every connected cable then use your soft-bristled brush to remove dust from the connectors and the seams. You can also use a Q-tip if needed to get into the smaller crevices, like around the binding posts. If needed, put a small amount of isopropyl alcohol (99%) or electrical contact cleaner (such as Deoxit) on a microfiber cloth and carefully clean each terminal.
Pro Tips: Don’t use your compressed air during this step! It could blow dust into the hardware instead of away from it. Avoid using water as well.
IN SUMMARY
We hope you’re feeling more comfortable about cleaning your speakers! Use this guide and follow its tips and tricks the next time you go about your speaker cleaning. It'll help your speakers look and sound the best they possibly can.
Remember: Always treat your equipment with the care and respect it deserves!
And if you’re looking to invest in a couple more good speakers for your home audio system, we got you covered: we have a wide selection of stereo speakers from bookshelf pairs to center channels to floorstanding. You can find all our speakers here. Thanks for reading!
https://spencertified.com/collections/home-stereo-speakers


Leave a comment